Tuesday, November 29, 2011

How to make your own earring organizer!

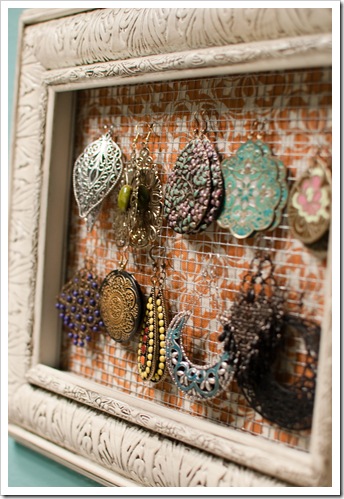
This project is inspired by my mother-in-law because she's always making funky and weird household things with her own little touch of style to them. If you choose to do this project, I guarantee you that it will be uniquely you and nobody else will have one that looks the same. If you're not down to pay a pretty penny for most of those metal carousel hangars to put your earrings into, you may want to consider making your own earring organizer.

 This is better than placing your earrings in boxes, as you can forget which ones you own (if you have many like I do) and you might have a hard time finding the pair you want in the mornings. Having your earrings out in the open and on a wall, not taking up any space at all in your home, is an ingenius way to go about displaying them.


The tools you will need for this fun and inexpensive project are:

- inexpensive picture frame (from a thrift store or new, it doesn't matter)
- scissors
- fabric large enough to fit behind your frame
- picture hanging kit (if the frame lacks the proper hanging ability)
- sandpaper (hard and soft grade sandpaper)
- paint
- paintbrush or painting sponge
- something to cover the area you're working over so you don't create a mess - like newspapers
- wire mesh or screen of some sort (window screen can be found at hardware stores)
- heavy duty stapler or hot glue gun (gorilla super glue may even do the trick)

The backing of your creation can be as interesting as you want it to be, you can use produce bags, several wires wrapped around each other, fabric in any array of patterns, or even lace! Make sure that your picture frame is free of any nails or anything that can hurt you while manipulating it, remove nails using hardware pliers. You won't be needing the glass associated with the frame, so you can toss that out or use it for something else, or the backing that comes with it. Make sure you lay down some newspaper or rags before continuing on. First you will want to start sanding with a very gritty sandpaper to get any excess paint or spliced wood off your wooden frame and then smooth it out using a soft grit sandpaper. You don't have to do the sanding if you love the way your frame looks to begin with, but if you want to change the color of it, make sure you sand down the old paint first, and paint on a new layer of whatever color you choose.

Turn your frame around and have the back facing you while it is laying flat. Using your hot glue gun or stapler, stretch the mesh and append it taught to the inlaid part of the frame, making sure you're pulling it apart so that it looks straight and doesn't create waves. Cut the excess of the screen off using your scissors after you have secured it on all sides to the frame.

 Then you will want to glue your fabric to the back of your frame, making sure that the pattern is facing away from you and to the face of the frame (it would be a shame to put it on the wrong way, wouldn't it?). Glue one side and then pull it taught after it has dried and get an even spread across the whole frame. Cut off the excess fabric so it doesn't pop out along the sides of the frame. if your frame doesn't have a hanging kit attached, wait for everything to dry and apply it to the back of the frame. Hang your frame on the wall where you want it to be or just prop it up on your desk if you don't want to hang it. And it's as easy as that! Now all you have left is to hang your earrings in a creative way on your frame.


Melting your lipsticks & making your own lip balms

Do you fear that you're turning into a lipstick hoarder? Do you have tons of little lipstick tubes hanging out in your drawers, purses, car and bathroom? Then maybe you will want to consider this interesting idea I have for you: make them into lip-palettes. It's a very simple process that anybody who owns a microwave can do. I imagine that at this point you're basically picturing a Salvador Dali-esque lipstick melting slowly all over the place. I assure you, this is not the case, I have a way you can do this in a very controlled and neat manner. I promise it's all worth it.

There are very logical reasons why you might want to do this: to de-clutter, to see all of your colors at once and make choices more easily, and to get the small remaining amount of lipstick out of the tubes you have mostly used up. The melting method lets you get the most bang for your buck, so you don't go out purchasing another lipstick when you have a decent amount stuck inside your lipstick container that you just can't get at. If you have colors that you absolutely loathe, this is a good time to get creative, you can mix them together and get new and exciting colors! Let's begin.


What you'll need:
- tiny spatula or cuticle pusher
- microwave or a candle (I recommend using tongs if you're considering the latter)
- container to put your melted lipstick in
- lipstick
- rubbing alcohol

First, you will want to take your container of lipstick and use a tiny cuticle pusher/spatula to scrape out the lipstick, you don't have to worry about making a mess or crushing it (I promise we'll reconstitute your lipstick in a manner that is beautiful). Place the lipstick chunks in your new lipstick container. You can choose an empty pillbox, palette, plastic container, glass container, used-up lipbalm case, or stacked dollar-store containers or bead organizers (my personal favorite). Whatever container you choose, make sure to put your lipstick in and dilute it a little bit with a few drops of rubbing alcohol so you can mix it together for an even consistency. Then nuke your lipstick in the microwave. Be careful not to do this for longer than a 5-7 seconds at a time (depending on the strength of your microwave) because your container can crack. Try to work with a material that you know won't crack in the microwave.

If you use a lip brush to apply your lipstick, you will get the most out of your product and you won't be wasting any on your fingers. Also, if you think your containers will melt in the microwave, use a microwaveable tupperware container or bowl and then simply scoop or pour your melted mixture into your container of choice. If you choose to turn your lipsticks into more of a 'lip balm' you will want to mix in some shea butter. How much you add really depends on how much pigment you want in your lipbalm, because the more shea butter you will add, the less color you will see. Make sure to thoroughly mix them together with mixing medium or rubbing alcohol before you melt them. This is a fun and easy project! Enjoy yourselves and show me some of your creations!


Monday, November 28, 2011

Ikea Furniture Extravaganza

I'm sure it's the one of the most common stories you've ever heard and it's about people moving into their first apartment and furnishing most of it with findings from Ikea. We are definitely no different. While a lot of their furniture can be cheap, poorly made, and downright yucky-looking, there are some modern diamonds in the rough. It also helps to have a handyman who is capable of putting it all together.
TOBIAS chair $79.99
MALM dressing table $129.99
We visited an Ikea this past Saturday and picked up a few things to 'finish off' our apartment, and most importantly, to 'finish off' my makeup nook. The current desk in the makeup haven is a dressing table with a drawer that slides out like a dream and consists of a wooden frame and glass top which is easy to clean and very beautiful on top of the white. The chair we recently bought is called the Tobias chair and retails for $79.99, we call it the 'ghost chair' because it's see-through. It gives an elegant upscale feel to the whole nook. I adorn it with a lime-green detailed pillow which matches our home. I definitely suggest looking into this chair for an affordable option to those designer chairs which have a similar appeal.

My makeup nook
I garnished the lovely cake that is my makeup corner with two floating shelves to hold my creams and perfumes, I bought a little wire rack from Daiso Japan to place my palettes on (far right corner) and used rubbermaid mini-storage drawers for the excessive amounts of makeup I have. I have a small oval mirror from Ikea in addition to the reversible lighted magnifying mirror which has 5 different light settings. This corner has everything I need to feel beautiful, luxurious, and comfortable. My morning routine here makes me feel as though I can do anything I set my mind to.

Across from my space in the bedroom we share, my hubby has his computer on a desk we just purchased on Saturday, accompanied by a comfortable computer desk-worthy chair. We wanted to get the chair in the white variety but it was unavailable at the time so we just picked up the black one that they had in stock rather than waiting and paying for delivery or going back later. The desk is a good size as it fits his 27-inch mammoth of a monitor and it is sleek enough not to over-encumber our bedroom. You can place the open-framework legs of the desk on either side, we placed ours on the opposite side than what you see in the photo to give the illusion of more space as you walk into our room. The Verner swivel chair is very comfortable, especially for the price, it has wheels that you can roll it around on and it leans backwards an adequate amount. It is a fairly ergonomic chair and does not take up as much room as most computer chairs do. The two drawers of the desk are fairly shallow and are not very capable of holding more than a few papers or assorted computer gadgets (we keep the latter here).
MICKE desk $69

VERNER swivel chair $59.99


Cyber Monday Sales

So as most of you know, today is the day the internet gives something back and gives us Cyber Monday in repayment for sucking the lives out of us the rest of the year. I've scooped out the best beauty deals for you and thoroughly researched the web for deals. You will want to take advantage of these sales because cosmetics products only go on sale when an item is being discontinued, is old, or a store will no longer be carrying that brand... it is very rare that they just have a great sale, usually the sales are fairly bogus. The best deals I can find thus far are:

- Stila's warehouse sale where things are up to 80% off can be found here. They make fabulous eyeshadow and lipgloss

- E.L.F. has a 50% off any purchase over $25 (code 50wide) offer or you can get free shipping over $25 (SHIP25) at their site here - it's unfortunate that you can't have both offers, though

- Cherryculture has 20% off your entire purchase on their website, they have great NYX products and most of their stock is inexpensive to begin with

-  Clinique gives you 3 deluxe sized samples (which means bigger than sample size but smaller than the full product) for any purchase on their website, this is a great deal because the items they have as samples can be amazing: such as blush, eye creams, lipsticks. So I suggest you pick up something you love by them and would use up even if there was no free offer (I get the De-Puffing Eye Massage Serum).

- Elizabeth Arden has 25% off any order and free shipping with code BF2 here and a free 9 piece deluxe gift set with any order over $40.

- Tarte has a pretty lame deal of 20% off up to $100 and then you get $30 off, the code is CYBER and you get a free full-sized gift here

- Shiseido (which almost never has a sale on anything) has a gift of deluxe samples including a primer, translucent powder and satin face color in a cosmetic pouch for purachases of over $50.

- Bath&BodyWorks has an amazing deal of 25% off your entire order with the code CYBER2011 and when you check out anything in the Holiday Traditions Body Care selection you get buy 1, get 1 free for double your order!

- The Body Shop has any 3 single items in the online store for $30... that's right, even if the one item you chose was over the total price, it will still only be charged as 3 for $30. You also get free shipping with any purchase. If you add the code JOY10, you also get 10% off your order. So 3 items end up being $27, when usually just one would run you higher than that. Plus you get the free shipping... this is an amazing deal for night-cream and moisturizers.

Happy hunting everybody!!!!

Saturday, November 26, 2011

Black Friday madness

So, after am enormous Thanksgiving meal, those of us dedicated to shopping, haul our fat butts out the door and waddle on to our store destinations. We do this, hoping against hope that we'll be amongst the first ones there. This is almost never the case, as people have been camping outside of the most popular stores (like Wal-Mart, Target, and Best Buy) for days in advance even in suburban localities outside of Seattle. So without any hope of ever reaching a cash-register within the next 12 hours at any of these stores, my husband and I moved onto ULTA. This store was the complete opposite, it had cutesy deals, very few ladies inside, no pushing or shoving, and we could easily reach the cash register. To me, the decision was simple, I'm a much larger fan of cosmetics than I am of technology anyway, so I picked up a few things.


They had this collection of items which were all just $1, so I grabbed 5 CHI Silk-infusions bottles for $5 because I love the way these make my hair feel (a small bottle usually retails for $14). Then, I purchased a mint lip-balm, swirl lipgloss and 3 ULTA nail polishes for another $5. Most of the items are $3 each, so the savings is of 66%. I purchased two Stila eyeliners in a pack, one being gold (named Koi) and one being silver (named Silver Dollar) as this was on special for $10 when the regular value is around $40, you can still get this deal here. I thought it was a great deal and Stila's smudge stick eyeliners are absolutely fabulous. The pigmentation is strong and they glide on very smooth and easily, they are absolutely perfect for the holiday season. I spent $20 in total on these items and ULTA gave me $5 Bonus Cash, which can be redeemed on the next $25+ purchase at their store. I was very happy with the overall experience.

Colors: The Jungle Look, Alter Ego, Scene Steel-er
I was drawn to the nail polish because the color was very pigmented and festive, also the price was right and I was looking for more colors to perform my 'water-marbled nails' look! This is a fun and funky way to set yourself apart from everyone else.

The next day, armed with new ambition and rigor, we headed out to Southcenter Mall in Renton, Washington. This place was controlled chaos. The parking lot was chock full of cars, there were tons of security guards throughout the mall, but if you can stand feeling claustrophobic, it was a fine shopping experience. The lines to cash out were not that long, especially at MAC. I went to use their BACK2MAC program where I recycled 12 containers and got 2 eyeshadows of my choice, in the colors Brown Script (matte2 finish) and Swish (frost finish). These colors are both very beautiful, and best of all, they were free! The color pay-off is great, as with all MAC eyeshadows and you can de-pot them (which I did) and then recycle these containers as well when you have 6. I only purchased a 15-color palette to house my colors.

MAC's Brown Script (Matte2)
MAC's Swish (Frost)
I hope you all had an amazing Thanksgiving and I would love to hear about your Black Friday deals! Stay tuned for our IKEA haul in an upcoming post!

Wednesday, November 23, 2011

The Foundations of Foundation: The Basics of a Healthy-looking face

Want to know how to make your complexion perfect? Let's delve into the world of foundation to even out your skin-tone and cover up any blemishes or unevenness that we all suffer from. Nobody is blessed with absolutely flawless skin, so don't feel bad about having to use one product or another to enhance your appearance because most women, and many men, do.
Remember when testing products out on your skin, do not apply them to the back of your hand because the skin there is a different saturation level altogether than the skin on your face, so look in a mirror and apply the tester-color to your neck. This is also a good way to see if your skin will have any allergic reaction to the product since the skin on your neck is very sensitive. A great makeup application is one that looks as natural as your own skin, so when looking for your ideal foundation or concealer, purchase something that best resembles your own skin.

When it comes to price-point, I'm not one to encourage the purchasing of expensive foundation products because, let's face it, they all contain harmful chemicals in similar amounts. So, if you're going to burn through a lot of product, you should opt for the drugstore brands rather than the expensive designer stuff. I personally have been very satisfied with the performance of L'Oreal's liquid foundation in the 'Visible Lift' and 'Infallible' line, as well as Maybelline's 'Match Perfection'. The positive note about these drugstore brands is that they are also at least SPF 15 so you get that little bit of protection that your skin needs from the sun's harmful rays (yes, even in the winter). If you have a choice of which kind of bottle to buy your liquid foundation in, go for the one with a handy pump because it keeps bacteria out of your product and is the most hygienic of the bunch. 

If you're looking for a bit of a sun-kissed look, then opt for a foundation that has a little bit of a tint or go a shade darker than your skin naturally is. Always apply your foundation with either a sponge (which you should replace weekly at the latest) or a foundation brush (which should be washed regularly). All foundation brushes have the same bristle shape because it is ideal for applying your foundation to your skin. You will want a synthetic brush so the bristles do not get ruined from oil-based foundations and they are also easier to clean because the product will not penetrate the bristles, it will stay on top of them. If the brush does not absorb your product, you will also be using less product overall, thus creating less waste.

Coverage
There are various finishes and types of coverage when it comes to foundation products. Usually the terms refer to the opacity of the product, or basically how much it will cover up your own skin. Sheer coverage is very transparent and will not hide your pimples and problem-areas but it will do a fairly decent job of evening out your skin-tone if that is all you're looking for (though, I would say that most of us need more coverage). Light coverage is basically the same except that it will cover very small colored-spots on your skin, such as freckles. Medium coverage is higher up on the scale and can cover blotchiness, discolorations, freckles, and some scarring (something that falls into this category would be a tinted moisturizer). Full coverage foundation, the kind most people probably are using at the moment, is very opaque and will cover anything you need it to camouflage. It is important that when you apply full coverage foundation, you do so very carefully, making sure to use a brush or sponge to blend the color all the way up into your hairline and under your chin, down to your neck. Otherwise, others will be able to see a visible difference in color and consistency between your skin and the foundation (even if you've chosen the perfect shade for you).

Choosing a shade
Sometimes it's hard to tell exactly what skin-tone we are, because much of it depends on which light we're looking at ourselves under. It is also important to realize that it is a complete misconception which says fair skin is cool-toned and dark skin is equivalent to warm-tones. This is not always the case as you will come to realize. Your shade can either be cool or warm, and within each of those categories there are sub-categories of light, medium, and dark. 

Cool-toned light and medium skin has a pinkish cast and the inner wrist of the person contains more blue than dark veins. These individuals are highly likely to burn in the sun very easily. The darker shades in the cool-tone range have a blueish cast to their skin, have more blue than green veins, and can also burn easily. Warm-toned skin that falls in the range of fair to medium has a greenish cast and these people have more green veins than blue veins on their inner wrist (the exact opposite of those with cool-shade skin). This group is more likely to tan in the sun rather than burn easily. Dark warm-toned skin has a chocolate tone and shares all the same qualities with their fairer skinned group. 

Make sure you know which category your skin fits into when you are purchasing your cosmetics. If you see 'NC' or 'NW' on cosmetic-codes (MAC uses these codes religiously in their concealers and foundations) know that it refers to 'neutral cool' and 'neutral warm' skin tones. You should stick to the one which best represents your skin tone for a flawless match. Some people can fall right in between, and in this case either of the shades will work for you.

Types of foundation
The types of foundation are classified according to their chemical base. Oil-based foundation is probably the oldest of the bunch, it has been around for a very long time, and the base is usually a waxy consistency or similar to petroleum. It provides the most coverage of all but easily smears and is really not practical to be using on a daily basis. 

Alcohol-based foundation is a specialty product because it is made for people with problem-skin. It reduces the chance for the makeup to clog your pores, it is a difficult application using cotton pads and usually has 'pore minimizer' in the name, providing only very sheer coverage. 

Powder or talc-based foundations are usually brushed on from a compact and they are 'stickier' than their loose-powder counterparts. Powder foundation is often used on top of other kinds of foundation for a fuller more-polished finish. One must be careful though, when applying this type of makeup, because it can look cakey and will probably need re-touching in warmer weather. 

Mineral foundation is slightly different because it tends not to use talc as a base, being more 'healthy' for you in general. The coverage of these solutions is medium at best because they are in loose powder format and do not have so many skin adhesives or chemicals, they are mostly made out of minerals mined from the earth. They usually give a nice shiny appearance which gives the illusion of healthy, dewy skin. 

Finally last but not least, my favorite all time foundation, water-based products! This is probably the most popular of the bunch and is a creamy liquid that can give you medium to full coverage, depending on your application (if you use it lightly, you will cover some of your problems, but if you use it heavily, you will cover everything up). I suggest using this product with a brush as it blends out much more successfully than with a sponge (definitely do not use your hands to apply this). 

Cleaning lint off your Hair Brush

Do you look at your brush and notice those pesky white buggers clinging on for dear life at the base of the bristles? Do you wonder if it's dandruff and, if so, what you should do about it? If you don't have a history of dandruff and it's not flaking all over your clothing, then don't worry, you don't have a severe case of dandruff. In reality, this is probably just some of your dead skin cells off your scalp, but mostly random lint that was stuck in your hair from your pillow or dust that has accumulated and gotten condensed and stuck down on your brush. This doesn't mean you have to throw away your brush either. Some brushes we purchase can be extremely expensive, and if we were to throw them out every few weeks we got debris on them, we would be out a lot of money. So I'm going to give you a simple, yet effective, method for cleaning off your brushes completely; it involves a little bit of elbow grease and a basic solution.

First, to get rid of the bulk of the debris, you should use a comb to take out any of the lint and hair from the bristles of the brush, all the way from the bottom to the top of the teeth. Then, you can either use a large bowl for this, or just simply the sink to fill about 3/4 of the way up and fill it with the hottest water you can get out of your tap. Pour some of your shampoo inside, about as much as you could fit in your palm and swish it around to make a lather, and do the same with about half a cup of distilled white vinegar (this is the regular, inexpensive vinegar). Place your hairbrush in the sink or bowl and let it sit there for about 15 minutes to soak so that your debris becomes moistened, softer, and easier to get rid of. After taking the brush out, use the comb again to remove what is left of the lint by pulling it the opposite way (pull it towards the base of the brush this time) because it will be on the top of the bristles. You should do this every few weeks if you can, it will help get rid of all that stuff that makes your hair oily when you brush it, namely old gel residue, hair spray residue, flaked off skin cells and the oils from your hair that have accumulated on the brush. Try not to use the brush until it is fully dry because brushing your hair with a wet brush may cause it to cling to your hair and pull out pieces that should not have otherwise come out.


Tuesday, November 22, 2011

Q-Tips: a double-edged fuzzy sword of eardrum doom

Q-tips are useful for so many things: cleaning in between your keyboard keys, touching up your eyeliner, cleaning excess nail polish off your fingers, and for most of us, and most importantly, cleaning inside our ears. If this sounds about right to you, you should be alarmed. Here's a little Q-tip history for everyone, in 1926, these 'Quality-tips' were named 'Baby Gays' according to their website. Obviously, as time went on, people realized what a ridiculous name that was and changed it to just 'Q-tips'. Imagine what a marketing nightmare it would have been to leave the original name in our present-day society. Would cotton swabs, by any other name, have been as popular? Apparently not, because we use the name-brand as the genericized trademark for an entire category of cotton swabs now.


Did you know that Q-tips were never intended to be used inside the ear? Many ear, nose and throat doctors (also known as otolaryngologists) are furious at their patients because the majority of people do use Q-tips inside the ear as unintended. There is a big warning label on every package of cotton swabs that says not to insert the tip into your ear. If you must use it on your ears, only use it on your outer ear, or the external cartilage. Why is it that we've never been told this by our parents or grandparents? That's because, apparently, we've been doing this wrong for almost a century and what's worse is that we have been passing on this terrible habit to our offspring. We use it to get all that yellow gunk, also known as earwax, out of our ears and to get water out after we shower, and we tell ourselves it's so that we don't become ill when we go outside in the cold after a hot shower. This solution is doing us more harm than good. If you want to use something to clean out your ear, use the corner of a washcloth or your towel.

You may be asking yourself what all the fuss is about, what's the harm in using these little cotton buds in your ear? Well, the problem arises when you blindly start to push it into your ear, and we all do this because we can't see what's going on inside our ear canal. Oftentimes, people rupture their eardrum by pushing the swab inside too deeply. Our earwax is an important part of our physiology because it is the protection provided for our inner ear to keep water out and keep bacterial infections at bay. Removing all of our earwax can prove very detrimental to our health in the long-run. When using cotton swabs, you are actually technically pushing much of the wax deeper into your ear canal, helping to create a painful plug. If you find that your ears are itchy and you need to relieve yourself by pushing something in there, try and control yourself and abstain from doing so because the more you scratch, the more you will itch and eventually just break the skin.

So keep your Q-tips around for cleaning your computer, video game cartridges, fans, or anything other than your poor ears. If you find that you have an ear blockage that is bothering you, gently pour warm water into your ear slowly but constantly with something like a Nettie pot and this will soften up the wax and allow it to slosh out. If you want to dry out your ears, use a towel or your hair dryer and hold it a safe distance away (your ear should not become overbearingly hot).


Monday, November 21, 2011

Screen printing our own shirts!

Screen for flat one-color shirts
I happened to be in the Superfad office in Seattle on Saturday and, to my surprise, one of my friends and an employee of Superfad, was there getting ready to screen print the company t-shirts. I found the idea utterly phenomenal because how amazing is it to make your own shirts? Armed with his amazing design, 60 blank shirts, the printed screens and buckets of paint, we began. I had no idea what the foundations of screen printing even were, but I trusted Sean because he said "it's easy" in a completely non-chalant way, as if he'd done it a million times before (he hadn't). I was just eager to help because it's just about the most awesome thing I can think of to make your own shirts. It combines very technical and precise principles of how-to with the fun and creativity involved in making the design and choosing the colors.


A. ink. B. squeegee. C. image. D. photo-emulsion.
E. screen. F. printed image.
The basic principles of screen printing are as follows: you push the squeegee across the screen and it draws your chosen color of ink over the photo-emulsion (housed inside the screen) and a printed image is transferred onto your shirt. That means if your shirt has multiple colors in different places on the shirt, you have to use multiple screens. We used as many as four, which is overwhelming because the base of the screen-printing machine has to be rotated each time and the registration (or calibration) of the position must be precise. The machine used to screen-print is extremely primitive and only consists of nuts, bolts and knobs that can be tightened to stay in place. Needless to say, it took hours just to get the screens in the right place but the good news is that once it is done, you can mass-produce shirts in that one pattern. So much problem-solving is involved in the entire production of shirts that it really is a wise idea to send away for your shirts to be screen-printed professionally because those companies will have a team of specialized individuals doing this. That being said, you will miss out on the opportunity to gain the fulfillment that we will get that everyone at the company's going to be wearing shirts we made!
The pile of 60 American Apparel blank shirts in all different sizes that we had to begin with

Colors for 4-shades of green/blue shirts
Before we could print, we had to spend time doing labor-intensive color-mixing, we began with flat one-colored shirts in black, white, and cyan. The colors are very specific and we had to match a pre-approved template mock-up off the computer and let me tell you, it is much more difficult to get colors to match than you would think without causing waste or making too little of each. We were also starting out from just base colors of green, blue, yellow, white, black and red (the latter color gave us tons of problems because it was old and cakey and would clog up our screen).

The maestro perfecting the process
Then when we finished these shirts, we dove straight into the most complex design: the 3D shirt. This design was by far the hardest for us to accomplish because the red paint was tripping us up to the point where we had to clean the red-screen each time we did a shirt on both sides with a screen opener solution. Then we had to be careful that the screen was completely dry each time so that it did not smear the shirts. The placement of the colors in this design is absolutely crucial because the red and blue dye slightly overlap and this overlap is made up of a dark grayish tone, to simulate a faux 3D effect. After each color pass, it is vital to 'cook' the shirt or place it under an industrial heater for a few seconds (but not too much because it would burn the shirt) to let the color set before going onto the next one so you do not create a mess on the under-side of each screen. This hiccup would then be transferred on each subsequent shirt, rendering it messy and useless.

Completed 3D design Superfad shirt
Completed four-shade design in green

The next day, we braved another tough design, this one included four-shades of cyan or green, creating two different tones of the pattern. By now, we had become pros, a well-oiled machine making beautiful and memorable t-shirts. I'm extremely happy with the way they all turned out, and with t-shirts we found lying around in a box around the office from previous passes at t-shirt making, we created so many different options of shirts that nobody in the office will be dressed the same. These shirts have a real authenticity to them, you can feel the logo and it makes a lasting impression like beautiful graffiti designed by one of my favorite artists. I had so much fun doing this, I think if you have the opportunity to do it, everyone should experience it at least once, so you know what you're paying for every time you buy a screen-printed t-shirt.
Piles of varied styles when we finished

Piles of one-color t-shirts

Sunday, November 20, 2011

The pros and cons of teeth whitening kits

For those of us who have somewhat yellowish or off-color teeth, teeth whitening kits might be a consideration. It is a simple option, available at any nearby Wal-Mart or drug store that doesn't require a whole lot of patience or visiting your dentist. Many times, the effects of the options readily available to us are quite astounding and help to brighten our smiles and overall presence in a room.

Kits that you can use in your home will work for changing your smile anywhere from three to eleven shades of color. Whether it be in gel form, whitening trays, toothpaste or strips, each of these works in a very similar way and is much less invasive than what your dentist can do with laser teeth whitening procedures (and far less costly).  However, like anything else you're using, you have to think about whether or not you should, if there are more pros and cons out of it for you, or you could do some serious harm to your smile.

A simple solution is tooth whitening paste because it requires very little effort, it's really just about brushing your teeth as you do as always, merely replacing your current toothpaste with whitening toothpaste such as Crest 3D White. The price-point is just right, costing just a little bit more than regular toothpaste (by about a dollar or two), and there is no associated pain or adverse effects. If you have severe discoloration, you won't see much improvement, if any, from these toothpastes, but they have been proven not to affect the health of your enamel, so you don't risk anything from trying it out.


No matter what you are doing, if you're using a medicated or chemical agent, you should always follow the instruction precisely. Have a timer with you when you are whitening your teeth and make sure you do not leave the strips or trays on longer than the instructions say to or you can ruin the enamel coating that protects your teeth naturally. Some people can experience tooth sensitivity where anything that touches their teeth causes extreme pain and awful sensation. Obviously, if you have used teeth whitening methods and this happens, stop immediately and visit your dentist or use Sensodyne toothpaste. You should not be using tooth whitening kits if you have receding gums, sensitive teeth and gums in general, or are allergic to peroxide (active ingredient in tooth whitening kits), but you should discuss it with your dentist before you go ahead and attempt doing so on your own. It is also important to note what kind of teeth you have because brownish-tinted and grayish-tinted teeth do not bleach well and if you have obvious fillings, bleaching will do nothing for their color but make them stand out even more in comparison to the rest of your newly-whitened teeth.

An easy way to make sure your teeth are white is to follow a proper diet heavily infused with fruits, vegetables, and drinking plenty of water. If you drink red wine, pop, caffeinated drinks, or colored drinks, you will diminish the whitening result fairly quickly. It almost goes without writing that if you smoke cigarettes, you should quit for a myriad of reasons, one of them being that they stain your teeth permanently and whitening kits won't do anything for you.

You may have other, associated issues causing your teeth to change color, for example, if you suffer from Bruxism (tooth grinding) you will wear away the bottoms of your teeth and inside the chipped areas  you will see yellowness. You should go see your dentist if this is the case for you so that they will provide you with a custom mouth-guard to be worn at nighttime when you cannot control your jaw's motions.

Saturday, November 19, 2011

Bacne: Back+Acne Treatments

Whether you're an athlete, a teenager, or just like everyone else, you may be afflicted with acne or pimples on your back. It is classified as zits that come up on your back, chest and shoulders inclusively. There are some mechanical ways to make sure that you don't breakout or contain your current breakouts. If you notice that you are starting to get some, you may want to wear loose clothing which is newly cleaned because you want only soft cotton fibers on your skin as they will remove excess sweat and skin flakes. If you're a girl and you wear a bra, try to wear a new one every day for this same hygienic reason. Your straps should fit well and not chafe against your skin throughout the day, but if you find that you get breakouts regardless, then try to switch to a strapless bra. Sometimes your acne can be an allergic reaction to your laundry detergent or the fabrics you are wearing, so try to eliminate any possible allergens. Bacne is formed when your pores get clogged by when excess sebum formed by your sebaceous glands and dead skin cells attracts bacteria. The reason why your back is so prone to acne is that there are more sebaceous glands here than most other places on your body.

Washing regularly
First and foremost, this should go without saying but it is definitely worth reiterating: if you want to get rid of your bacne, you must wash every day. Using anti-bacterial soap during your daily (and even twice daily if you have the time) wash will help eliminate the bacteria in your pores. Don't over-scrub or over-wash the area because you can irritate your skin and cause it to become too dry. If your skin is too dry it will go into panic-mode and release too much sebum to cover itself up, leading to more acne. You want to maintain a balance of moisture on your skin. Gently use an exfoliating sponge, loofah or washcloth during your shower (yes, you want to shower unless you are having a salt-water bath because soaking your skin in a pool of still water can increase your chances of getting more bacteria in your pores). Because the skin on your back is generally a lot tougher than the skin on your face, you can exfoliate gently every day and not just once a week, it is safe to do so as long as you're not worsening your irritation. Make sure that you wash your body with a medicated body wash that has two percent salicylic acid or benzoyl peroxide, specifically letting it sit over the area which has pimples before you rinse it off.

If you can get near a beach - alternative treatment
The simplest method to get rid of your breakouts is to visit the beach. Having your skin submerged in sea salt water for approximately ten minutes can drastically help your skin. No cream or cleanser will help your skin the way the ocean can because it has natural anti-bacterial properties. The warm temperature of the water helps to cleanse the skin. Sand also can act as an exfoliating agent and improve your complexion if you gently rub it on your afflicted area. If you can't get near a beach, then you can achieve the same effect by boiling a mixture of salt and water and letting it sit to the side until it has cooled. Use this solution to wash your face and body to get rid of dirt and oil.

Infuse moisture
Use a moisturizer after you wash your skin to increase the hydration level of your pores. However, make sure that the product you use is oil-free and medicated if your acne is severe. If you are already using a medicated soap or treatment, then use just a regular moisturizer without medication in it that is highly hydrating and is noncomedogenic, which means that it does not block pores, because this will reduce the incidence of pimples and will not allow the salicylic acid or benzoyl peroxide (pimple treatments) in your other products dry out your skin.

Medicated treatments
If you use medicated creams or gels, try to go for ones that say they contain benzoyl peroxide or salicylic acid but do not use both. If you use both of these substances together on your skin they can have negative effects on your skin and may burn your skin pretty severely. The burns from these products can be worse on sensitive skin than any acne, so you may want to consult with your dermatologist if you have a history of negative skin reactions. It is important that you use a hydrating cream over top of these treatments or after you clean them off because your skin will be dried out. These treatments are also bleaching, so make sure you don't put your clothing right over top immediately because you won't be able to repair the color.

The rule-of-thumb is that if you're using one product that is medicated, whether it be soap, treatment or moisturizer, you want them to either be from the same line of products or stick to just one of them so that there are no negative interactions between the chemicals used. You don't want to overload your skin with chemicals, it may have an adverse reaction to this. Rather than experimenting on your skin with harsher treatments if you don't know how your skin might react, I suggest going to visit your dermatologist. Some problems are too severe to take care of with over-the-counter treatments and regular body washes. Some treatments may take weeks to work and others may have no effect at all on you so you may want to seek help especially if you have deep, painful cysts on your back. If you have a serious affliction or problem, you may need an aggressive topical treatment or antibiotics, to avoid scarring and for the best possible results visit your dermatologist.
How to apply false eyelashes

Before adding fake lashes
Looking to spruce up your eyes and make your eyeshadow application pop? Well, this is a great solution for daytime or nighttime, just make sure you don't choose lashes that are too dramatic. A good way to tone down any pair of lashes you buy is to cut them in half and only apply one half of the lashes to the outer corner of your eyes. This will drastically reduce strain on your eyes and make them very wearable, and you don't risk looking like a clown (it also reduces your cost because you can turn each eyelash set into two separate sets).


One false eyelash cut in half can be worn on both eyes
First, do your eye makeup application in full, including your eyeliners, a cats eye look is great with false lashes because the winged tip of the eye liner masks the seam of the false lashes. Make sure your hands are washed and disinfected thoroughly before you attempt to place false eyelashes on because you don't want to get any nasty bacterial infection or allergic reaction. 

Then, you want to use a medical-grade lash adhesive such a Duo, I personally prefer the white formula which dries clear because it masks any mistakes you may accidentally make. Place a small dollop on the back of your hand after your thorough cleaning. Then, working relatively quickly before the glue dries (but don't worry, you have a good minute or more), run the backing of the eyelashes through the glue and let them sit for 15-30 seconds while the glue becomes tacky. 

Fake lash application
When placing the lashes, try to get them as close to your natural lash line as possible but do not, under any circumstance, place them over top of your actual lashes. Getting the glue in your eye can be painful and you want to avoid this. If you have a thicker eyeliner application, it makes putting your lashes on much easier because there will not be any skin-colored gaps between your lashes and the fake ones. If you are using a full-sized fake eyelash, you want to begin placing it down from the inner corner of your eye, and then tack on the outer corner, pressing down on the middle only after you have secured the ends. But if you are using my method of cutting your fake eyelashes down, then you will want to start at the outer corner and tack the end on where you feel it will look nicest (probably where your liner starts to wing out).

You can see from the finished picture that using only half of the eyelashes and turning them inside out (so that the shortest hairs go over top of your lid and the longer ones go to the outer portion of the eye) makes for a subtle, beautiful and feminine look. They look like an extension of your own eyelashes. You can finish off the look by adding black mascara to combine your own eyelashes with the fake ones for even more of a seamless look.

Completed half-lash application


Friday, November 18, 2011

Water-Marbled Nails

Finished design from this tutorial
Do you want to achieve salon-grade manicures at home with interesting designs but you're not very artistic? Well, I have the solution for you. Don't bother spending your money on magnetic nail polishes or nail polish strips, you can learn to do this right at home without having to go out and purchase anything.


Tools for this project
What you'll need:
  • Q-tips
  • Toothpicks
  • Nail polish colors (at least 2, must not be fast-drying)
  • Top-coat (can be fast-drying)
  • Nail polish remover 
  • Nails (real or fake will do)
  • Tape (any kind really)
  • A disposable cup
  • Room temperature water
  • Paper towels

You will want to prep your nails before you do anything else and make sure they are well cleaned, and apply a coat of nude colored nail polish so that the variation in color in your own nails does not affect the water-design and show through. Then you will want to set up your work space by placing down a paper towel to cover the table you're working on so you don't get it all dirty. Fill your disposable cup about three quarters of the way up with room temperature water (you can use filtered or tap water, some people say filtered water is better because there will be less bubbles in it). It is important that you use room temperature water because hot water will cause the polish to spread too fast and cold water won't let it spread enough. Place tape around your nail and on your fingertips so that you don't get your fingers all messy and have to go back with tons of acetone to clean them off. This step is a definite time-saver, although it may not seem so at the beginning.

Open your nail polishes up because time is of the essence when you are doing this, this doesn't mean rush, be meticulous but quick. Carefully place a drop of nail polish in the water and then place the next color inside the middle of the previous color. Do this over and over until you have your desired bulls-eye of colors.

Then use your toothpick to swirl the polish or drag it in and out to create a pattern. My personal favorite is starting from the second line and dragging it into the middle, but make sure you do not pull up, push the toothpick into the middle so that the nail polish does not separate. Wipe your toothpick clean after each swipe with the toothpick because the colors will stay on it and affect your design in a not-so-pretty way when you place it back in.


Place your fingernail down into the water wherever you think the design looks nicest. You can even put all of your fingers in at once if you want a random-looking swirl on each finger. Do not lift your fingers out of the water immediately. You will want to leave your fingers in the water and wait about 30 seconds until you take a q-tip and clean out the excess polish in the water (around your fingers). This will clear away any potential polish like a thin skin so that it does not affect your beautifully designed nails. Then you can lift up your nails. Wait a little while for them to dry and then remove the tape from around your fingers carefully so that you do not smudge anything. Use a q-tip dabbed in nail polish remover to clean up the sides of your nails and your cuticles of any nail polish. Repeat this process with all of your nails.
Before removing the tape
After removing the tape


Apply a topcoat as the final step to stabilize your design and make it glossy and this will also help to get rid of any excess water bubbles floating on the surface of your nail. You can make all kinds of designs with this technique, I only experimented with two nails so far but I've seen some beautiful designs on Google!